Showing posts with label buttercream. Show all posts

Tuesday, July 12, 2011

Fourth of July Flag Cake!


I can't believe a year has gone by since the last time I tried to make this cake.  This time around I think it came out SO SO SO much better!  Last year I made cake from a box...this year, given all the cakes I've been working on, I decided to do the whole thing from scratch.  While I'm still on the search for the perfect white/yellow/butter - call it what you wish - cake...the recipe that I stumbled on in the May issue of Real Simple certainly did not disappoint! 

I made five - nine inch cakes to pull this one off.  The blue layer was baked all at once while the red and white layers were split into two 9 inch cake rounds and then sliced in half. 

This is such a fun cake to make and I just love how surprised people are once it is cut open.  At first it looks like a very simple...maybe even boring cake.


Then...TA DA!!


Hope you all had a Happy Independence Day!!

Now...on to make myself a birthday cake!! 

P.S. - Here's a peek at what the cake looked like last year...


Saturday, July 9, 2011

Week 15 - Chocolate Chip Cake


We were invited to our neighbor's house for dinner and naturally, I had to bring a cake!  I cheated a little on this one...if it wasn't for me telling you my secret, no one would ever know!  Last week's Baptism cake didn't require as much actual cake as I had thought.  I still had frozen chocolate cake left and decided that I would somehow use it.  I cut the cake up so that I would have two square layers.  It was perfect.


I didn't take the time to have a crumb coat...so you can see some chocolate crumbs peaking through.  Honestly, I didn't think that it looked bad.  I used a brown sugar buttercream that tastes like cookie dough and then went crazy with the chocolate chips.  I even sprinkled mini chips on the buttercream inside of the cake.

We had a great time with our neighbors and judging by how much of the cake was left...everyone liked it!

Wednesday, May 11, 2011

Week 13 - Chocolate Chocolate Chocolate (Did I mention CHOCOLATE?) Cake!

Wow - I feel like it's been weeks since I made this cake.  Oh, wait - it has!  

 
My friend Natalie invited us over for dinner one night and this was the dessert that I brought.  The inside contained two layers of chocolate cake and tons of chocolate buttercream.  Then I smothered the outside with more chocolate buttercream. 


I wasn't 100% pleased with that so I had to call another friend to find out if I was losing my mind.  The phone call more or less went like this: "Hey Leigh, should I cover my chocolate cake that already has chocolate buttercream all over it with a layer of ganache? ... Yeah, that's what I thought.  Thanks, See you tonight!"


There you have it.  A massive chocolate overdose.  While I am getting a little tired of making this particular cake recipe - adding both the buttercream and ganache was definitely worth it.  

This picture looks a little lopsided - sorry!


Friday, February 11, 2011

Week 6 – Super Bowl Cupcakes!


Of course I had to bake something with a Super Bowl theme this week.  I couldn’t have cared less about which teams were playing because isn’t the Super Bowl all about the food?  I contemplated baking a football shaped cake but never quite found the design I was looking for.  I had wanted to make a 3D football…but time got away from me so I settled for cupcakes. 

I really wanted to try out grass decorating tip #233.  (Football is played on grass…right??)  The biggest challenge was figuring out how to make a football for the top of the cupcake.  I could have taken the easy route and just used the little football picks I had, but where’s the fun in that? 


Initially, I was going to mold caramels into footballs.  My caramels ended up being stale, so that idea was a bust.  I went out and bought a bag of Rolos and a bag of Tootsie Rolls hoping that one of those items would do the trick.  After a little trial and error, I figured out how long to pop the Tootsie Rolls in the microwave in order to soften them up enough to be smooshed into footballs.  Once the Tootsie Rolls hardened, I piped melted white chocolate on them to complete the look.  (At a later point in time I will post a little tutorial on having fun with Tootsie Rolls!)


The frosting I used this time was Brown Sugar Buttercream. It was amazing.  I will be using this recipe again and again for sure.  The only obstacle I had to face was that the frosting was slightly “gritty” because of the brown sugar.  Using this buttercream with the grass decorating tip was very frustrating.  The brown sugar kept clogging up the little holes on the tip and I had to disassemble the bag from the tip in order to clean it out half way through decorating each cupcake.  This frosting held my intended design perfectly…although in the future I will use a wider tip so that this little clogging problem won’t happen again.  

  
One of my regular cake critics – who I will leave nameless – preferred the smoother consistency from Week Four’s frosting… but the rest of us liked the brown sugar texture.  Can’t wait to use this one again…Look out Valentine’s Day!!!

Speaking of Valentine’s Day…maybe there will be some ganache, or fondant, or berries…Oh – the possibilities are endless… 

Saturday, January 29, 2011

Week 4 – Chocolate Cake with Swiss Meringue Frosting


Once a month, my son's school has meeting that many of the parents attend.  Naturally, for it to be a good meeting, there needs to be food...and CAKE!  I was very excited to bake something that I knew wasn’t going to be consumed alone!  Because I was making something for a group of people, I was a little hesitant to try something entirely new.  Whipping up the chocolate cake from week two seemed like a great idea, but I wanted a different frosting.  
 
I found a little inspiration on I Am Mommy's blog.  She made a cake that had this gorgeous ruffle design by Martha Stewart, for her daughter’s birthday.  I simply had to try it.  I thought it would be the perfect design for a bunch of women.  (Sorry…I know there was a dad there too!)  Most everything these days around here is blue…so picking pink for the color seemed like a fun idea.


I needed to bake two batches of chocolate cake in order to have three layers.  I made an interesting discovery during the process.  When it comes to baking powder, I usually use Davis or Calumet.  However, despite how much I detest shopping in Wal-Mart, the only baking powder I had in the house was Wal-Mart’s store brand.  Two weeks ago, when I made this chocolate cake recipe the first time, I used that baking powder.  The cake turned out great.  Last week, when I baked the Pumpkin Spice Bundt Cake I used Rumford - Aluminum Free baking powder.  Well…we all know what a disaster I had with that cake.  It never occurred to me that the brand of baking powder may have had something to do with it.  When I made the first two layers of this week’s cake, once again I endured a slightly over-flowing mess in my oven.  Nowhere near as bad as last week, but a mess nonetheless.  So I thought about what I could have possibly done different and realized that perhaps it was the baking powder.  I made the second batch of cake with the Wal-Mart brand powder and my chocolate cakes came out perfect again.  This discovery never would have been made had it not been for my weekly baking adventures.  I’m glad that I chose to bake the same recipe more than once.  Now, I’m much more inclined to try the Pumpkin Spice Bundt Cake again.  Only this time…with different baking powder!  (There will be some further research into the various brands of baking powder.  I had no idea that it sometimes contains aluminum.  That just doesn't sound like a good thing to be eating.)
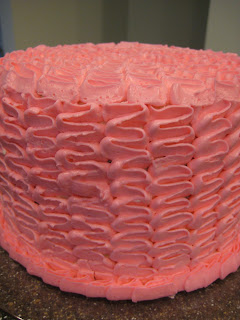

I’m not 100% sure how I felt about the taste of the Swiss Meringue Buttercream.  While this buttercream was quite buttery, it paired well with the chocolate cake because it wasn't very sweet.  I thought that this buttercream was very easy to decorate with and I will definitely try it out again sometime very soon.  I found that using wax paper worked great while I was practicing the ruffle design.  I used Wilton tip #103.  It did take a little while to get the hang of making the ruffle.  And…I must admit that I found it challenging to make the design go from the bottom of the cake to the top.  In the end, I made the ruffle go down the cake instead of going up the sides.  My design looked a little different, but if you didn’t know what it was originally supposed to look like, you would not have necessarily realized that I goofed.  When I was all finished and had some buttercream left over, I played a little more with it and figured out how it was supposed to have worked.  Of course I was aggravated that I hadn’t decorated the cake the proper way from the beginning, but that’s what you get when you have two kids to tend to all while baking and decorating a cake that you want to look presentable…in time for a meeting!


When the decorating was complete, I put the cake in the refrigerator until it was time to leave.  The cake didn’t have a chance to fully return to room temperature by the time it was served.  The frosting crumbed off the first few pieces that were cut because it was still too cold.  So, if you ever choose this buttercream recipe, please make sure that the cake is back to room temperature before you serve it. My son and I enjoyed the small piece that was left when I got home.  I had no problem cutting into it by that point and he was very excited to enjoy a slice with his mommy.  He told me it was “the most Beautiful cake EVER!”  And that’s how I knew it had been a success!


Final Notes:  While speaking with Emily the other day, she said that I should consider making a tutorial for one of these recipes.  That actually sounded like a great idea and I took pictures of almost every step during this cake baking experience.  When I got to the very end and was about to put the batter in the pans, my son knocked a glass off the counter and left me with a disaster to clean up.  The cakes went into the oven and the photos ended!  What I came to discover, once things calmed down in my kitchen, was that there is a video post of this cake being prepared by Ina Garten on The Food Network! (Picture me banging my head against the wall right now…) Anyway, while taking 1000s of food pictures can be very time consuming, it is helping me with my food photography techniques.  Once again…another work-in-progress!  It will be interesting to see how much my cake design, photography, and even web design improve by the end of this year.  This current blog is just a template set up by the folks at Google.  I do intend on designing my own page…just give me a few more weeks…

As for next week...One Cake a Week may combine efforts with Two Cupcakes in My Kitchen.  One can only imagine what we will bake up together! 

Sunday, January 16, 2011

Week 2 – Amazing Chocolate Cake with Buttercream Icing

As week two of 2011 was drawing to a close I made sure to get my second cake into the oven. What I am beginning to realize is that there are so many recipes and just not enough time! I find myself spending hours on the computer these days just searching for my next recipe. (I am pretty sure that I have enough work cut out for me to get me through the summer at this point!) Week 2’s inspiration came from I Am Baker, a yummy blog that I read. The post I read was titled, “The Best Chocolate Cake Ever.”


How could I go wrong? The most exciting component of this recipe was the fact that it called for a full cup of freshly brewed hot coffee. That right there made it the perfect choice for me! Well…the cake was scrumptious. Hands down – my new “go to” chocolate cake.


I used Magnolia’s Vanilla Buttercream Frosting that I also found on I Am Baker’s blog. The buttercream was very good AND very sweet – but that’s what you get for using 10 cups of confectioners sugar! I will definitely use this buttercream again. This frosting did contain a lot of air bubbles when I was spreading it out though. It was also quite soft when I was using it to decorate. In the future I would chose wider, less intricate tips. If you are wondering why it looks so busy, I can explain. I’ve never really fiddled with all the lovely icing tips that I have. One of I Am Baker's blog posts had a little tutorial on decorating and it made me just want to try everything! (Please keep in mind that I have difficulty drawing a stick figure!) And as far as deciding on blue was concerned…it is blue month at my son’s school – so I just went with it!


While my goal is to bake one cake per week for the entire year, I have quickly come to the realization that I cannot eat 52 cakes all by myself! That little tidbit works out great for my friends and family. I can pretty much guarantee that any time you see me throughout the next 12 months that I will have yummy goodness to share with you. So, not only do I have a goal for 2011…I have the ability to share delightful treats with you each and every single week!


Last night I had the good fortune to share this cake with my friend Natalie and her kids. While I’m sure she thought I was nuts for taking pictures of the cake at her house – a good time was had while digging into this tasty dessert!


Related Posts Plugin for WordPress, Blogger...